

Starting a sourdough mother
For baking your own bread.

Some time ago I encouraged those of us who rush about to try and slow down, if you’d like to have a read of that post you can find it here. Getting things done quickly has always been important, and it’s imperative in many ways. Time is money after all. The industrial revolution helped hurry things along nicely, and not long after that people started wearing wristwatches to keep an eye on the time. That was well before my time, but I reckon the microwave oven and the fast-food industry convinced yet another generation into believing that things needed to move even more quickly. I’d like to tell you more about the microwave oven and how it was invented by the military, but I simply don’t have the time. I do, however, want to share my process of creating something that happens quite slowly, and that is why I’d like to invite you on a journey to make your own sourdough bread.
Now there’s a lot that’s been said over the years about making bread, and the history of how human’s turned grains into bread is a very old story indeed. It’s my understanding that we can thank the pyramid building Egyptians for the invention of sourdough, however, whether or not it was intentional remains unclear, at least to me. Either way, should you embark on making your own sourdough bread, you might take some pleasure in knowing that this is the original method that the ancient bakers used to get their dough to rise. Most of the yeast that’s used in commercial bakeries these days is manufactured in bulk and acts very quickly. Remember, time is money. The yeast that you will be making requires a longer fermentation, and the whole process moves at a much slower pace and is one that I hope you will enjoy. It results in a wonderfully flavorful loaf of bread, that is easier for most people to digest, and is packed full of protein and whatever else you would like to add along the way.
I should like to point out that if I can make a loaf of truly delicious sourdough bread, anyone can. The sourdough starter, or sourdough mother (as it’s sometimes called) is made from either all-purpose flour, or bread flour. You can use either whole meal or plain flour, which ever takes your fancy. Of course, you can also use Rye flour or other kinds of flour, but for the purpose of this example I am referring to plain white flour which is cheap and easy to buy at your local food store. When it comes to baking your bread, I prefer to use bread flour, or flour with a higher protein content, so pays to read your labels. The one I am currently using has 12.6 grams of protein per 100 grams.
Here’s the list of things that you’ll need to get your mother batch started.
Clean empty jar with a lid. I recommend something that will hold at least 500mL’s of liquid. Instead of a lid, you can use cheese cloth/or muslin and hold it in place with a rubber band if you like. Just make sure you keep it covered because your brew will start to attract fruit flies pretty quickly.
A good temperature. Temperature is the key to getting things moving. Too hot, and your mixture will ferment too quickly and might go off, too cold and you’ll get sick of waiting for the wild yeasts to get themselves into gear. The optimal temperature is around 25 degrees C, so use your common sense and put it somewhere with a stable temperature, like inside your oven (oven turned off) or inside a microwave oven. Just don’t forget it’s in there.
Scales. If you don’t have a set of digital scales get some. They are not expensive and are way more accurate than using cups or other types of measurements. They will also help you maintain consistency as you make your bread.
Filtered water, or water without additives. Chlorinated water will kill the wild yeasts that you are trying to grow, so keep that in mind.
Flour.
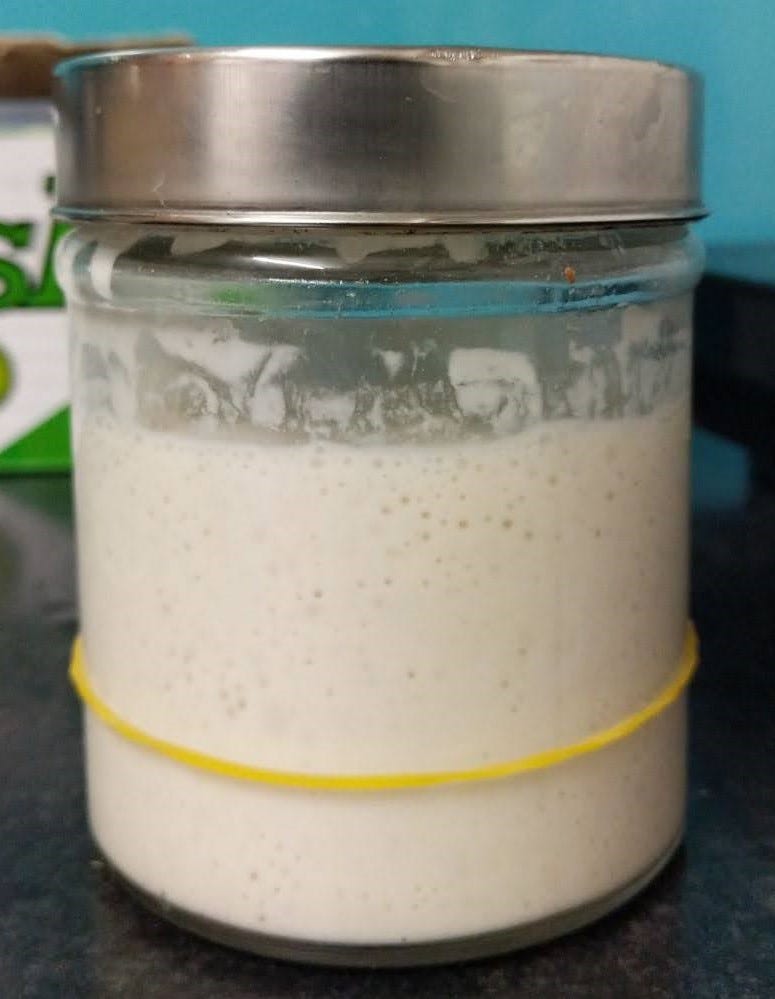
If possible, start your little sourdough adventure in the evening, and then feed it every night before you go to bed. I’ll include a link to a couple of the videos that I found useful in helping me get started, and hopefully they’ll assist you as well. On the day that you want to get started, begin by getting out your flour, water, jar and scales. Into the jar measure equal quantities of flour, and water and mix them together with a fork. I started mine by mixing 25g of flour with 25g of water. Put the lid on, and that’s all you need to do for the day. You will simply repeat this process until your sourdough mother is ready to cook with. You are aiming for your starter to at least double in size, 4-6 hours after you feed it. This picture is of my active starter, and the rubber band indicates the level it was just after I fed it. You can see how it has at least doubled in size, which means that it is ready to use.
The two video links I’ve included will show you two different ways to go about this process, just remember to discard some of your starter every few days to keep it healthy and active. . Once you have a healthy active starter you will have two choices on how to maintain it and I’ll include that information in another post. Finally, I also want to also point out that I am able to cook my sourdough bread without using one of those cast iron pots that you’ll see in the first video, so you don’t have to race out and buy one of those. In the meantime, enjoy your weekend and let me know in the comments how you went with making your starter. If you haven’t already subscribed to my musings please do, so ciao for now and thank you for reading.
Well you make it sound easy! And I've tasted some of your delicious bread, so yes, good stuff😋